
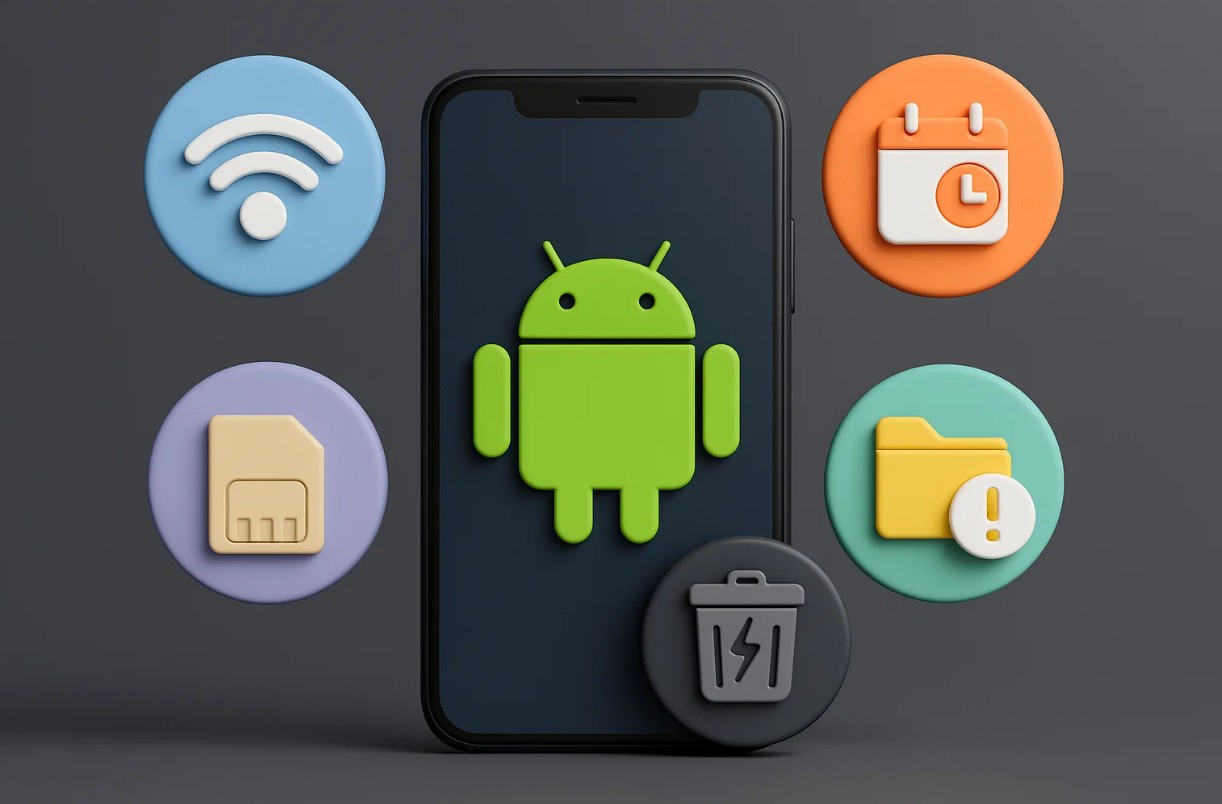
Although Android devices usually update smoothly, sometimes the process stops or fails. Many users face failed downloads or a device that keeps freezing during installation. These issues can interrupt daily use and create unnecessary stress. Yet, a dedicated Android repair tool can help you solve these troubles. Hence, in this guide, you will explore simple methods anyone can follow to fix update failures.
Part 1. Frequent Causes of Failed Android Software Updates
Sometimes Android updates fail for reasons that seem small but cause big trouble. Below are a few causes that help you spot and fix Android system issues before they grow:
- Weak Network: A weak network causes update files to download incompletely during installation. Unstable signals also trigger repeated errors that block the update.
- Low Storage: It also causes the phone to reject new system files needed for updates. Insufficient space also prevents the device from unpacking essential data.
- Corrupt Cache: Old cache files may conflict with new system data and stop updates midway. It causes verification errors that block the complete installation of updates.
- Date Mismatch: An incorrect date or time stops the device from verifying update servers. Inaccurate settings cause failed connections with servers that control the Android update process.
- Wrong Settings: This can also cause the system to block necessary update permissions. Thus, incorrect configurations also stop the update from starting.
Part 2. 6 Proven Ways to Repair Failed Android Software Updates Issue
The following part will help you explore the 6 ways to resolve the Android software update problem efficiently:
Way 1. Ensure a Stable Internet Connection
A stable internet connection ensures updates download smoothly without missing files. It helps your device maintain a steady link with Google’s update servers for accuracy. You should use a strong Wi‑Fi that prevents sudden interruptions that cause installation errors. Also, avoid mobile data networks during updates since they may drop signals.
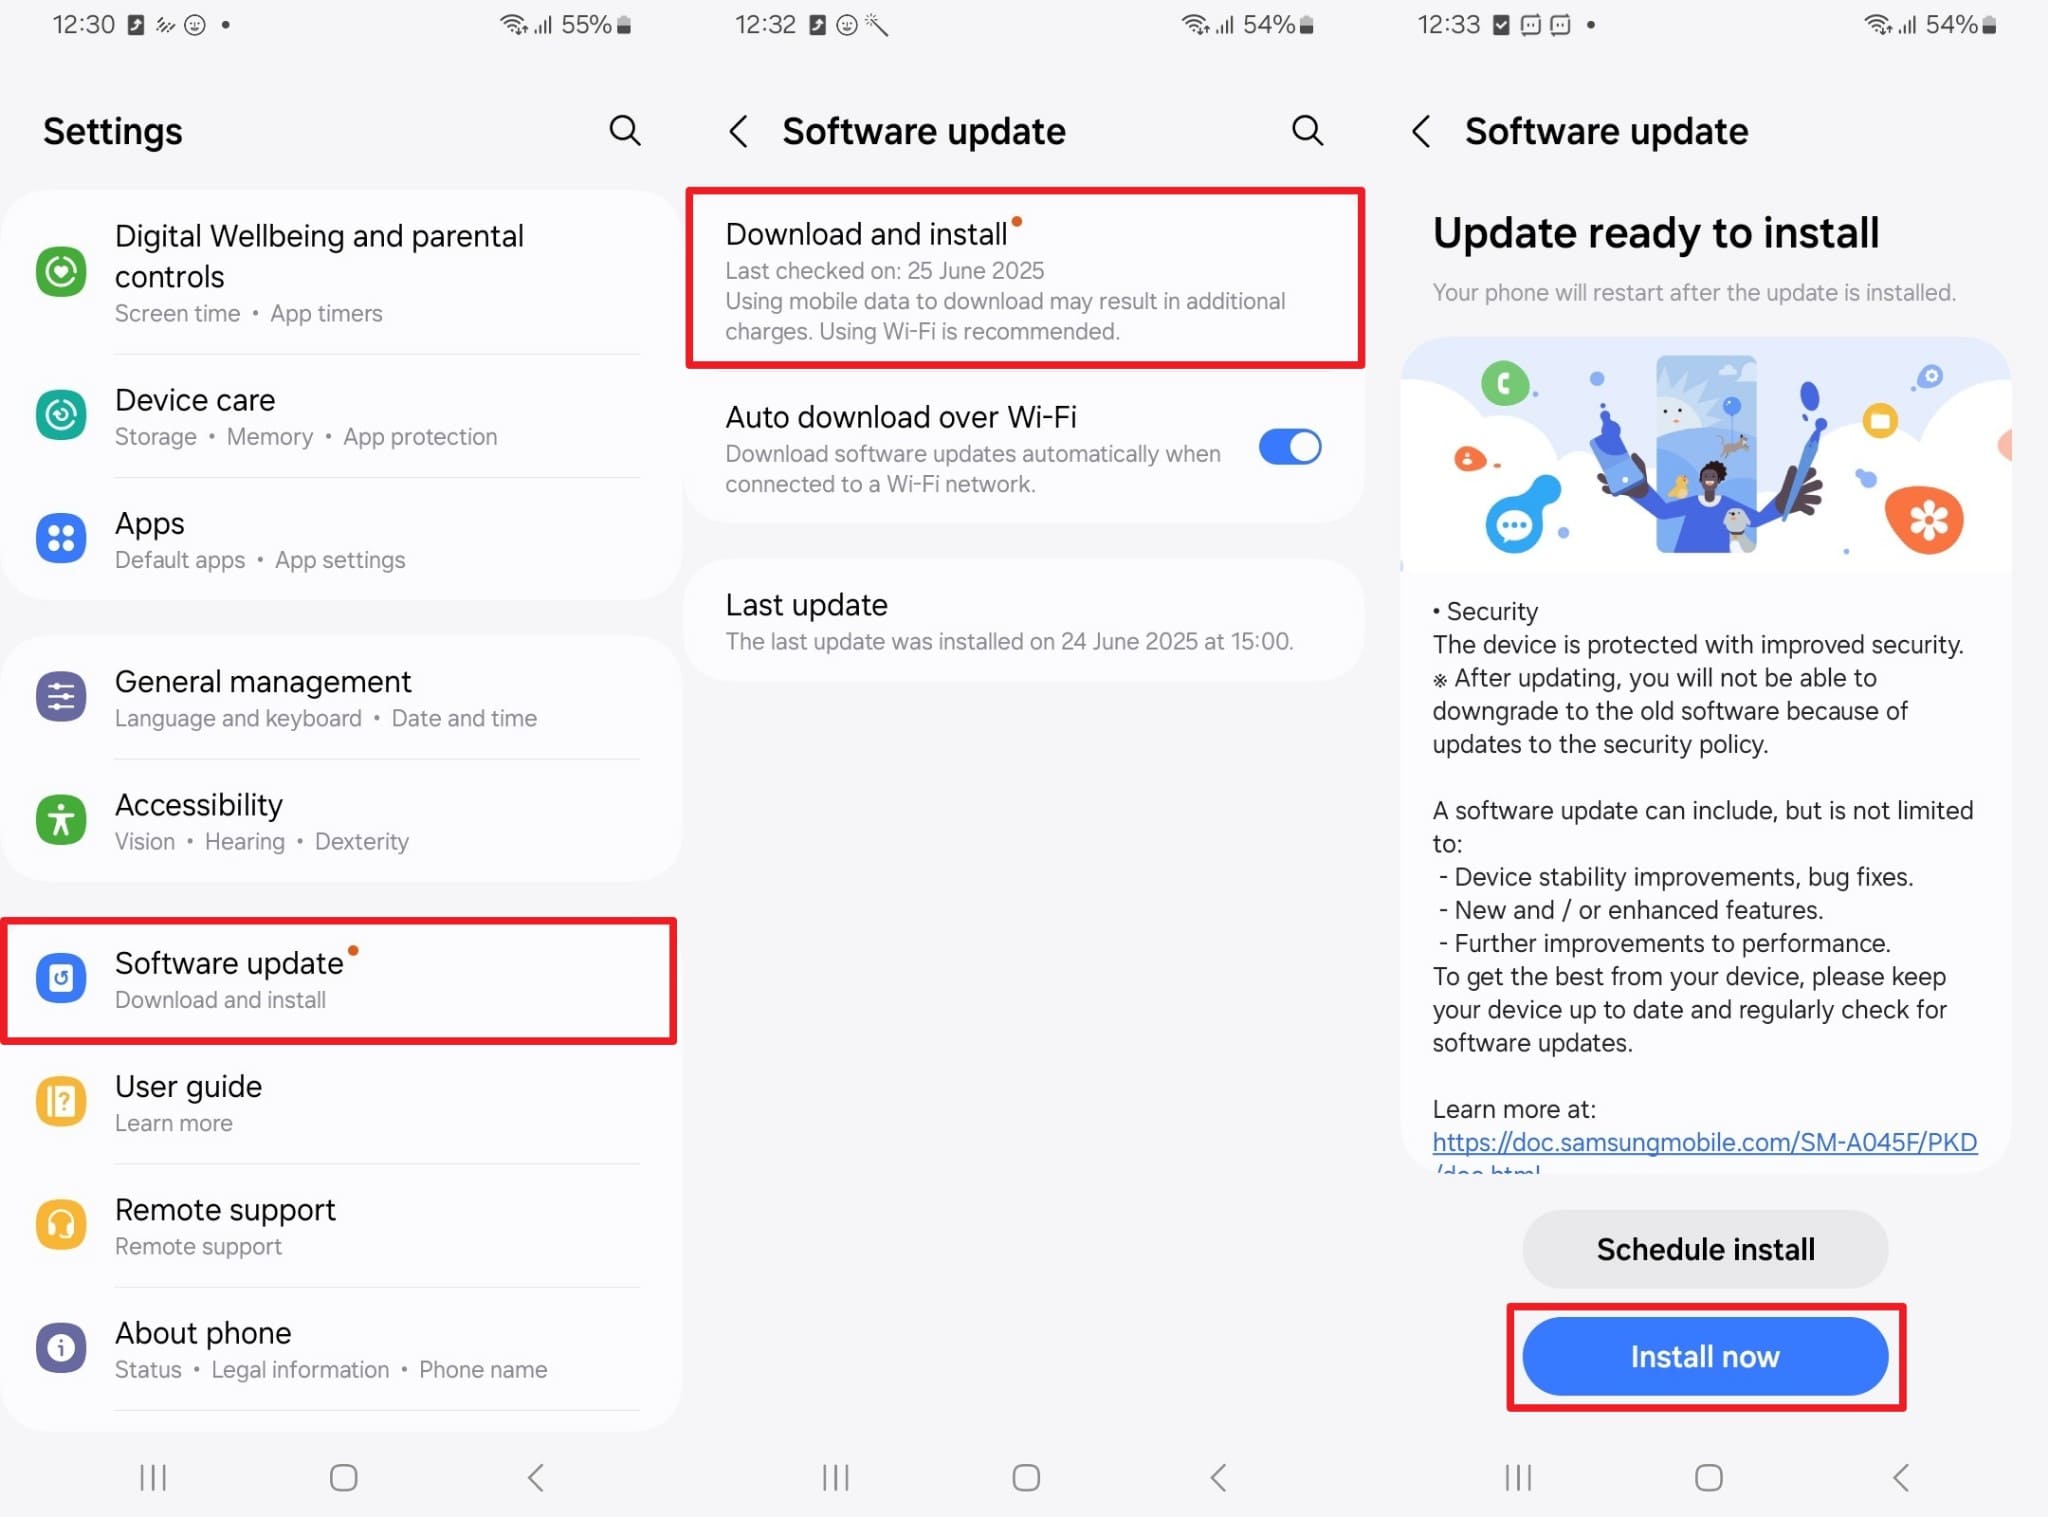
Way 2. Restart the Device & Retry the Update
You should also restart your device to give the system a fresh start and clear minor glitches. It helps remove temporary errors that block updates and slow progress. After restarting, retrying the update often works smoothly. This method can also fix Android system issues caused by stuck processes. Let’s explore how you can perform this procedure:
Step 1. When you press the “Power” key for a few seconds, opt for “Reboot” to restart it.
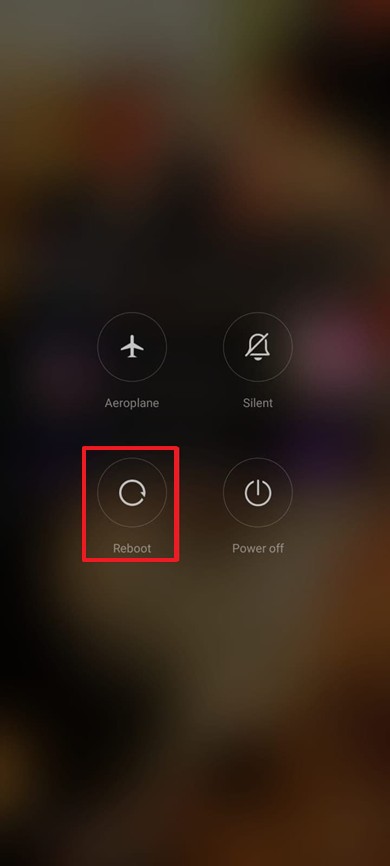
Step 2. Upon restarting, head to “Settings” and opt for “Software Updates.” Following this, tap “Download and Install” and press the “Update Now” button.
Way 3. One-Stop Android Repair Toolbox | Dr.Fone – System Repair (Android)
Beyond the above, users should try Dr.Fone – System Repair (Android) to resolve trouble with Android software update failures. This advanced Android repair tool fixes freezes and crashes caused by interrupted or failed software updates. Besides, the repair process protects personal information using encrypted steps during every system recovery. Additionally, it repairs devices without requiring root access, so it is safe for everyday users.
In addition, Dr.Fone supports various major brands, including Xiaomi and POCO. For that, it performs data‑preserving repairs on supported devices while maintaining system stability. Besides that, Samsung system repair requires complete data removal, so backing up beforehand remains necessary. At this point, users can rely on Dr.Fone Basic for wireless, selective, and local backups easily.
Guide to Resolve Software Update Failure Using Dr.Fone
After launching the tool, follow the steps below carefully to diagnose update errors and begin a guided repair process smoothly:
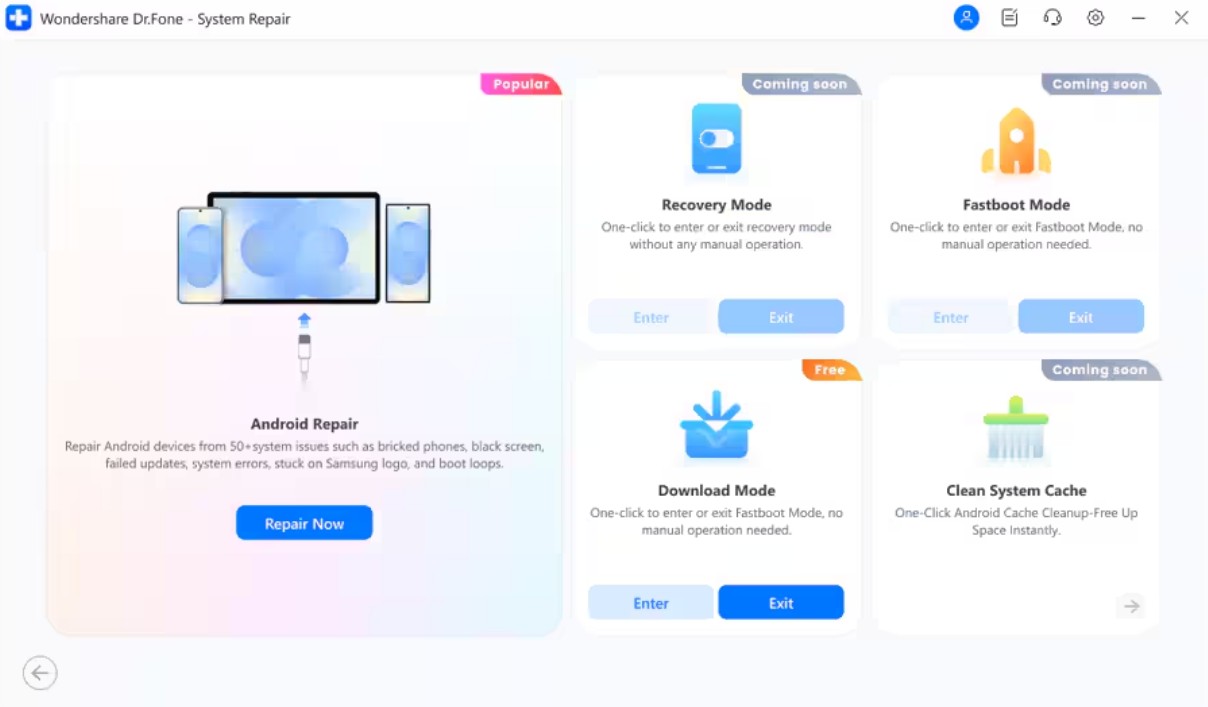
Step 1. Open the Android System Repair Tool
Go to the “Toolbox” section, select “System Repair,” and choose “Android” as your device type. Then, click the “Repair Now” button under “Android Repair” and connect your problematic phone to the computer.
Step 2. Enter Your Android Device Information
Pick your device brand, confirm “Failed Software Update” is available in the issues list, and click “Start.” Next, input your phone’s details, press “Next,” and put your device into “Download Mode.” The tool will then download the latest compatible firmware for your Android device.

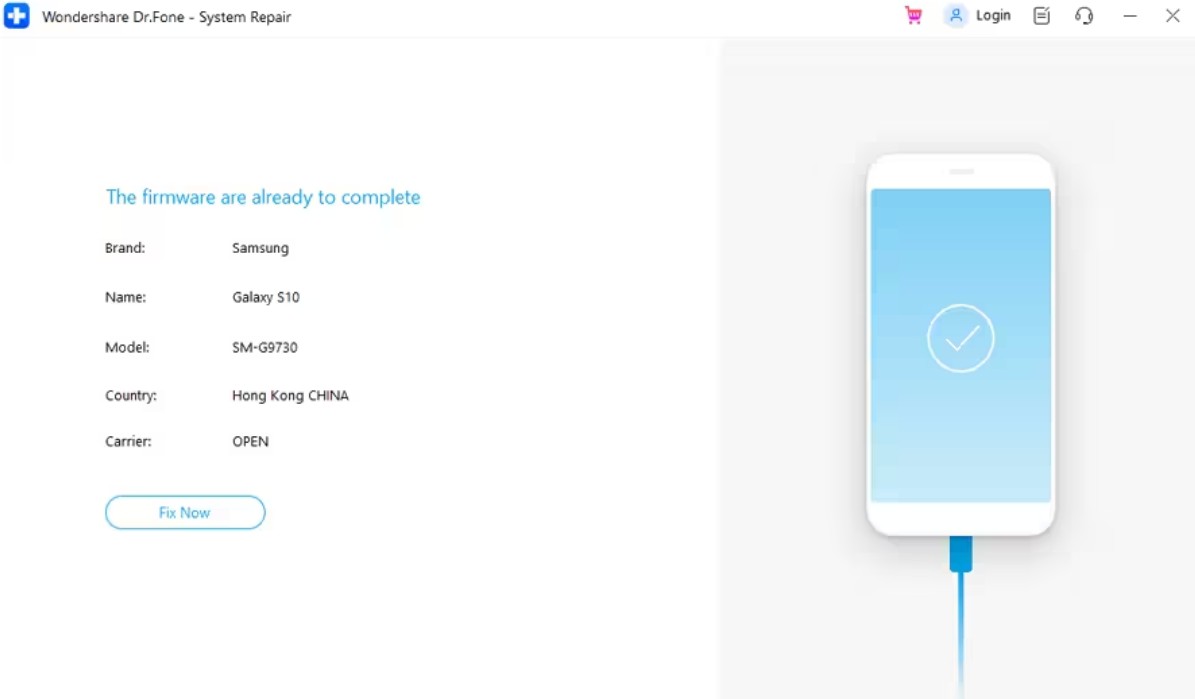
Step 3. Resolve Your Device Software Update Problem
When the firmware is prepared, opt for “Fix Now” and enter “000000” on the upcoming prompt. Then press “Continue,” and the software will resolve your device’s system-failed update issues.
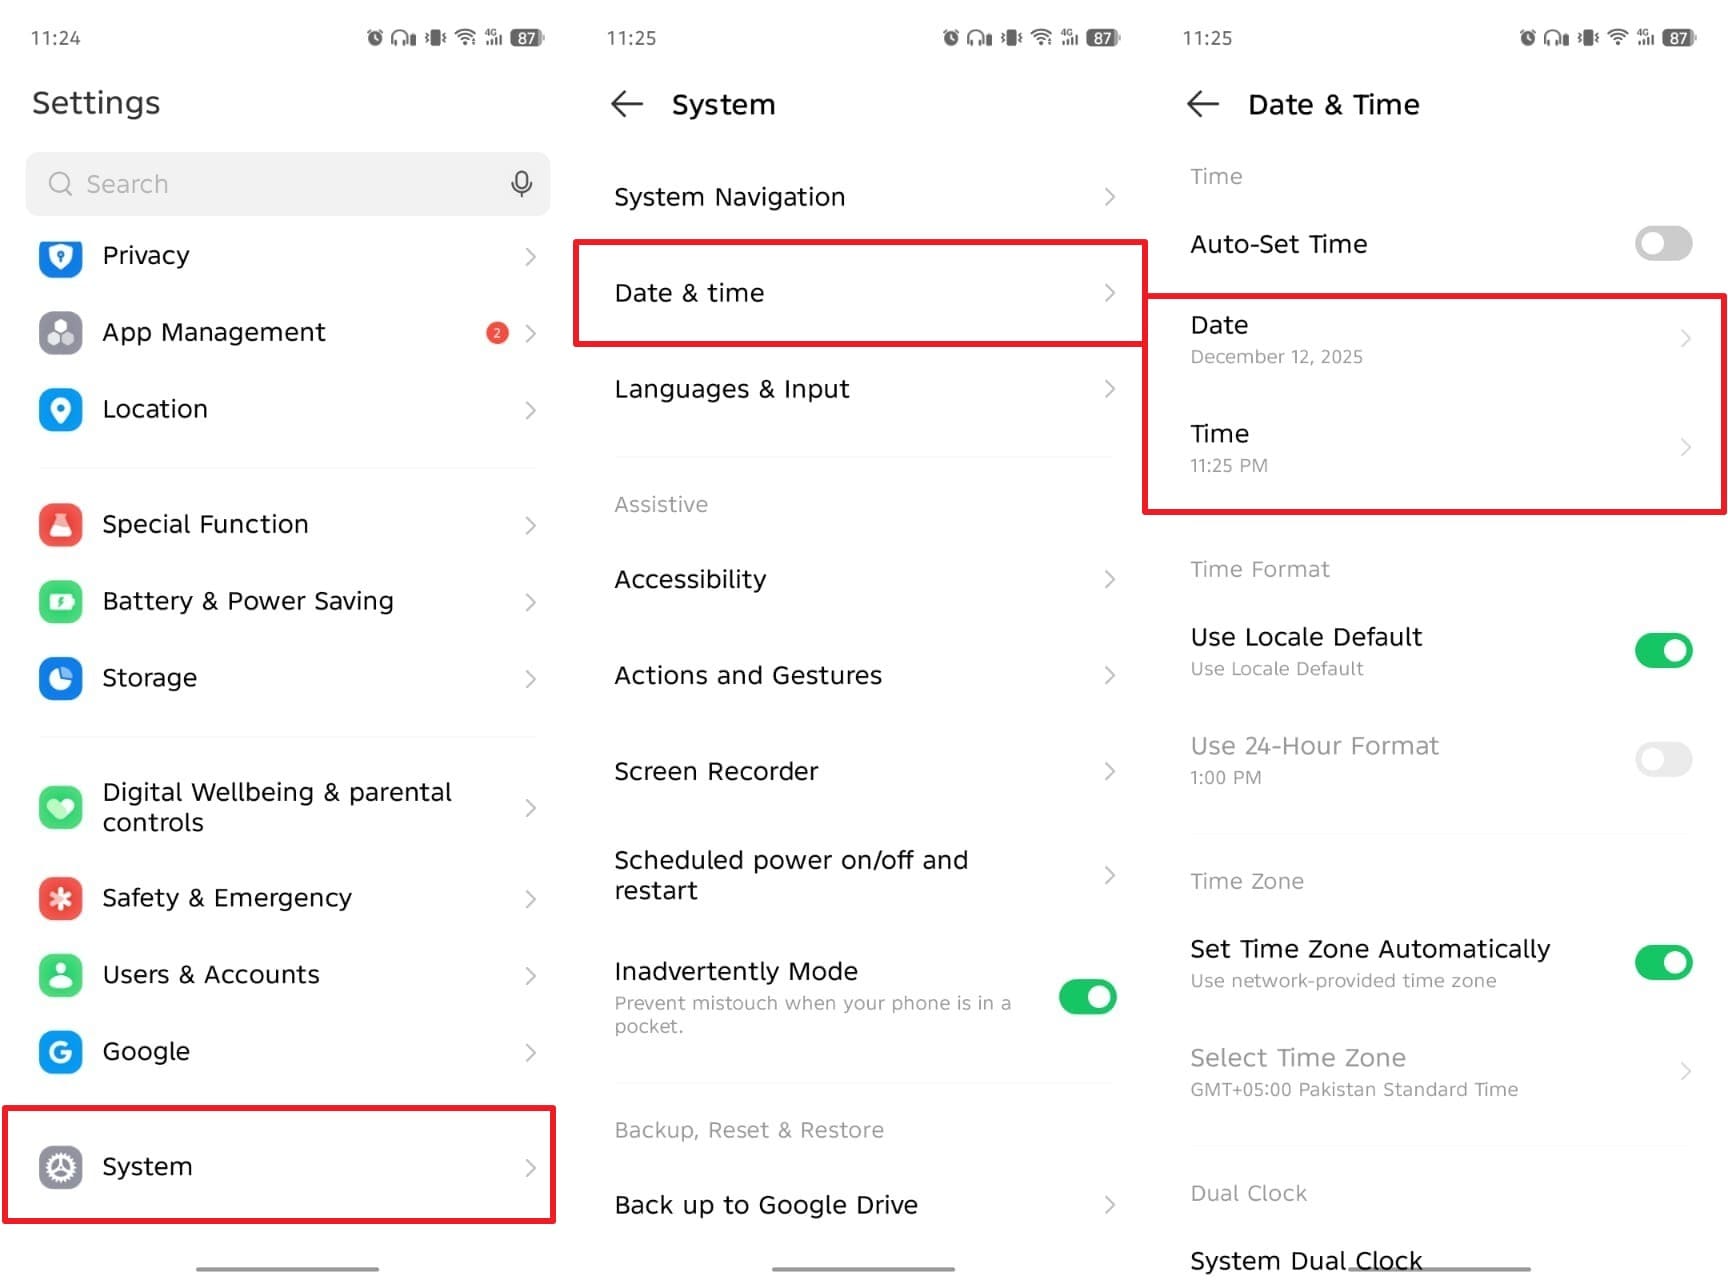
Way 4. Fix Date and Time Settings
Correct date and time settings also help your device connect with update servers online. They ensure system verification happens smoothly without stopping during the installation process. When these settings are wrong, the device may fail to connect and download files. Hence, review the following steps to fix date and time settings manually:
Instructions. Navigate to the “System” settings and access the “Date & Time” section. Afterward, tap “Date” and “Times” to set them manually.
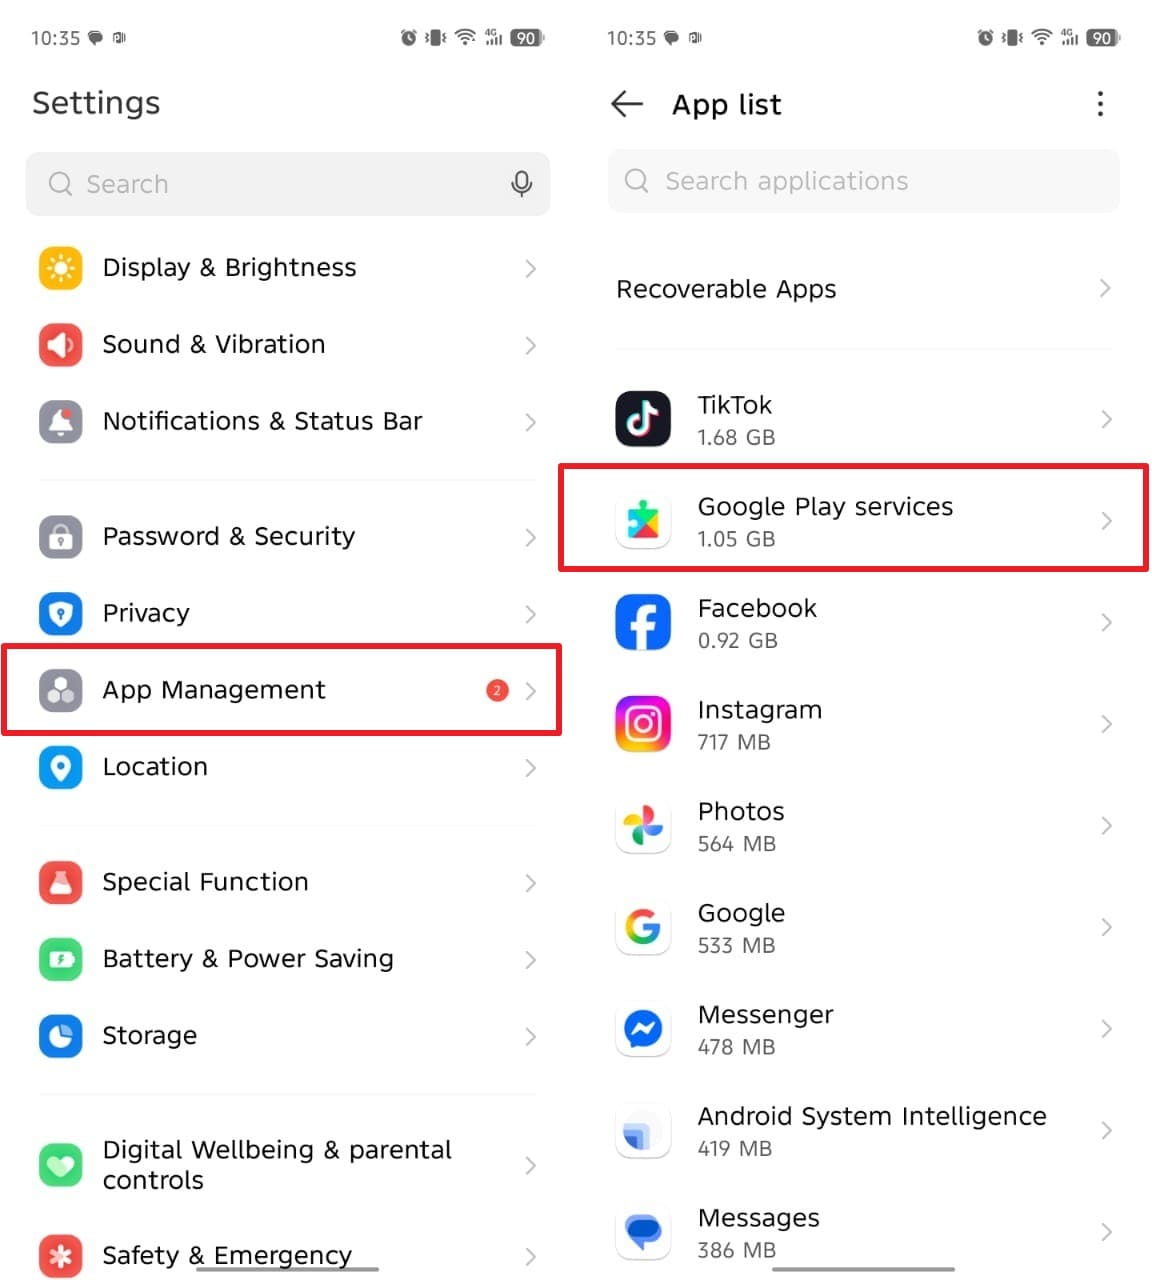
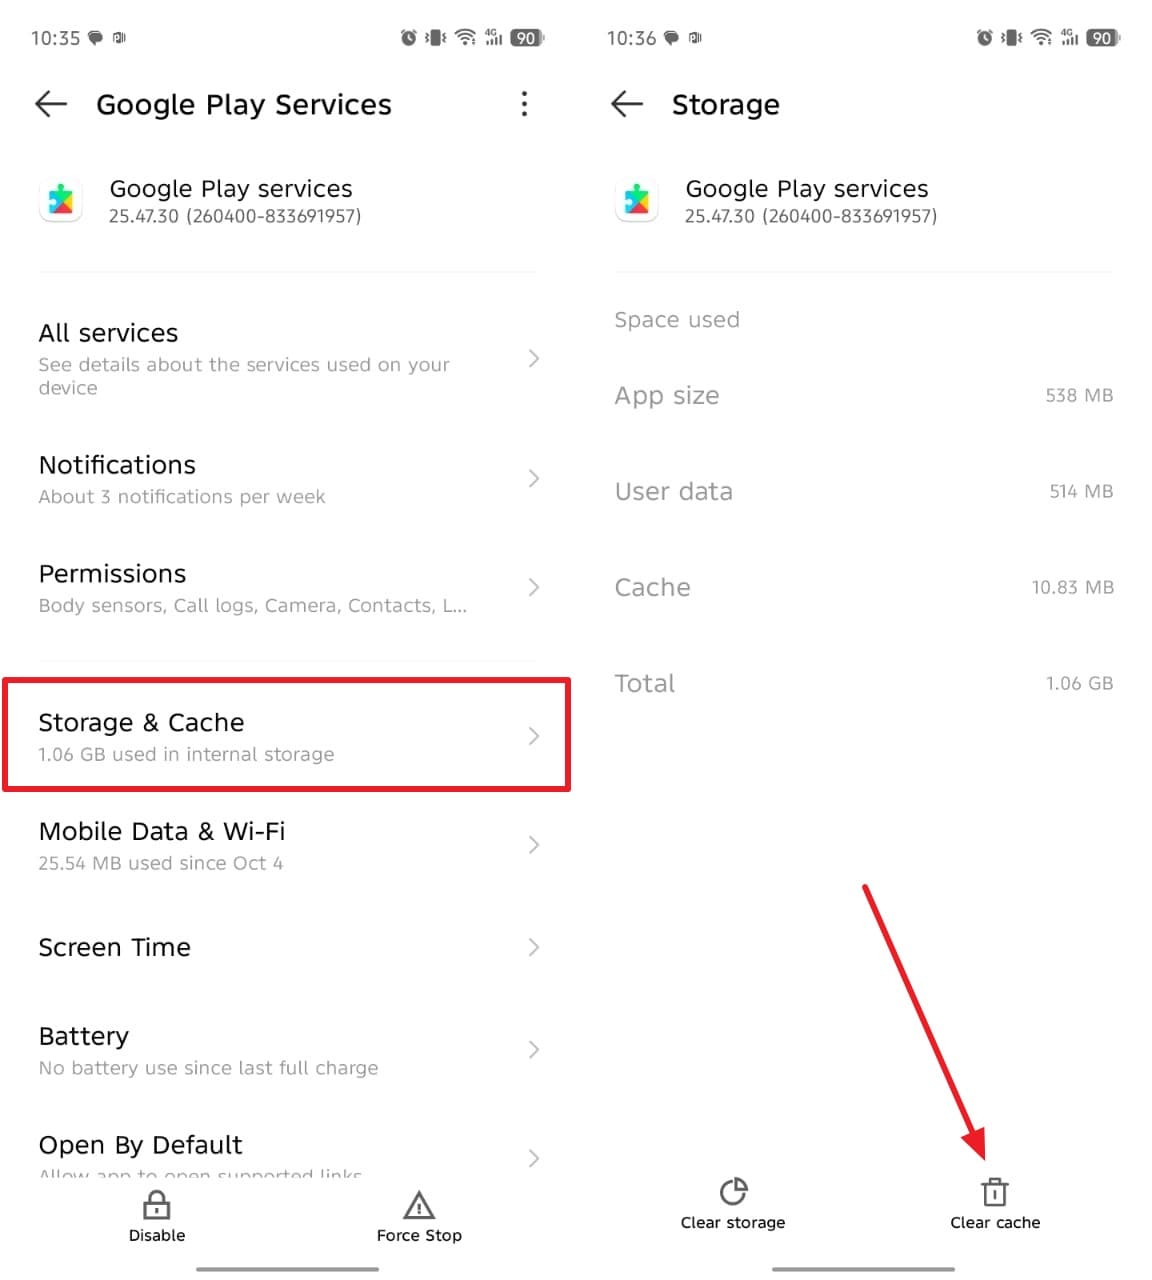
Way 5. Clear Update and Play Services Cache
Clearing the cache of updates and Play Services helps remove temporary files, causing delays. It frees space and allows your phone to download new update data without conflict. An old cache blocks communication between update servers and your device’s system software. So, follow the steps below to clear Play Services caches on your phone:
Step 1. To initiate, access the “App Management” section in your device settings to view your apps and tap “Google Play Services.”
Step 2. When you see the next display, go to the “Storage & Cache” section and opt for “Clear Cache.”
Way 6. Check Storage Space and Clean Up if Needed
Apart from the above, you should check the storage space to ensure your device has enough memory to install the update. When space is low, updates fail because the device cannot store the required data. Therefore, cleaning unwanted files or apps creates enough room for smooth installation. You can also backup Android phone to PC to keep data secure before cleaning.
Part 3. How Dr.Fone Fixes Android Problems and Why It’s the Best Choice
Dr.Fone helps users handle real Android problems that appear after failed updates. Thus, these use cases show how it can fix Android issues across multiple situations:
- Boot Loop: If your phone keeps restarting after a failed installation, Dr.Fone resolves loop errors. It reloads software components and allows the device to power on and function.
- Black Screen: Some devices freeze on a black screen after an update crashes, making them unresponsive. Dr.Fone repairs essential system files to bring the device back to full display.
- Frozen Mode: When phones get stuck in Recovery or Download mode, Dr.Fone safely exits them. It recovers system control and restarts the interface without manual flashing.
- Performance Lag: After failed updates, devices can slow down or heat up. Dr.Fone cleans system faults to enhance responsiveness and overall performance.
- Error Codes: Dr.Fone identifies all error codes blocking firmware installations on Android. It also removes conflicting files to ensure future updates download smoothly.
Conclusion
To conclude, this article has explored multiple easy solutions to fix the failed update issue. These methods help your device run smoothly and prevent problems during system changes. Yet, when issues continue, an advanced solution ensures quick recovery without stress. Thus, using a trusted Android repair tool like Dr.Fone saves time and prevents data loss. This dedicated tool restores your device’s performance and makes updates effortlessly.